Are you looking for a fresh way to express your style, perhaps with a twist on something familiar? So, the world of nail art offers countless possibilities, and sometimes the most exciting ideas come from simply flipping things around. We often see trends that feel like a return to an earlier time, almost like going back to the year 1999 for a new perspective on things, and nail fashion is no different.
This manicure style takes the traditional French tip and gives it a delightful flip, putting the focus at the base of your nail instead of the tip. It's a subtle yet striking change, one that can make your hands look truly special. You get to play with color and shape in a completely new way, which is really quite fun.
It's a way to transform your nails, kind of like how some people might look for "reverse hollowing" to change their character in a game, giving a familiar look a new lease on life. This particular style offers a neat way to update your appearance, offering a bit of visual interest without being too much. It's a popular choice for many, actually, who want something chic but also a little bit different.
Table of Contents
- What is a Reverse French Manicure?
- Why Try This Trend?
- Popular Reverse French Manicure Ideas
- How to Achieve the Look at Home
- Caring for Your Reverse French Manicure
- Frequently Asked Questions (FAQs)
- Conclusion
What is a Reverse French Manicure?
A reverse French manicure, sometimes called a moon manicure or a half-moon manicure, flips the usual French tip on its head. Instead of a line at the very end of your nail, you create a curved line at the base, near your cuticle. This curved area, which looks a bit like a half-moon, gets a different color or finish than the rest of your nail. It’s a pretty simple idea, but it makes a big visual impact, really.
This style draws attention to the lunula, that pale, crescent-shaped area at the bottom of your nail. By highlighting this part, you create an interesting focal point. It’s a very elegant and sophisticated look, yet it still feels fresh and modern. You can use any colors you like, making it quite versatile for different moods and occasions.
A Fresh Spin on a Classic
The traditional French manicure is a timeless beauty staple, but sometimes you just want something a little different. This "reverse" version offers that exact thing. It’s like taking a classic song and giving it a new beat, or perhaps like looking at older games, say from 1999, and finding new ways to enjoy them. It keeps the elegance but adds a contemporary edge, which is rather appealing.
Think of it as looking at something from a different angle, much like how someone building a computer might wonder about "reverse blade fans" for better airflow. You're still working with the same basic structure, the nail, but you're applying the design in a completely new direction. This makes the familiar feel exciting again, and that's a good thing.
Why Try This Trend?
There are many reasons why people are falling for the reverse French manicure. For one, it’s a simple way to update your look without a complete overhaul. It adds a touch of fashion-forward thinking to your everyday style. Plus, it’s surprisingly adaptable, fitting into many different settings, which is pretty useful.
It also gives you a chance to play with color combinations you might not usually consider. You can go subtle and understated, or bold and dramatic. The choice is completely yours, and that freedom is part of its charm. It's about personal expression, really.
It's a Statement
This style makes a statement without being overly flashy. It shows you pay attention to details and enjoy being a bit unique. People notice it because it’s not the usual thing, and that's kind of the point. It reveals a bit of your creative side, much like how a "reverse phone lookup" might uncover information you didn't know was there.
It’s a subtle rebellion against the norm, a quiet way to show off your personality. You get to decide how much of a statement you want to make, from a barely-there shimmer at the base to a vibrant pop of color. It's a fun way to express yourself, you know.
Versatility is Key
The reverse French manicure works well on all nail lengths and shapes. Whether you have short, rounded nails or long, almond-shaped ones, this design looks good. It can be dressed up for a special event or kept casual for daily wear. This adaptability is a big part of its appeal, actually.
You can match your manicure to your outfit, your mood, or even the season. Light pastels for spring, deep jewel tones for winter, or bright neons for summer – the possibilities are endless. It's a style that genuinely lets you experiment, which is something many people enjoy.
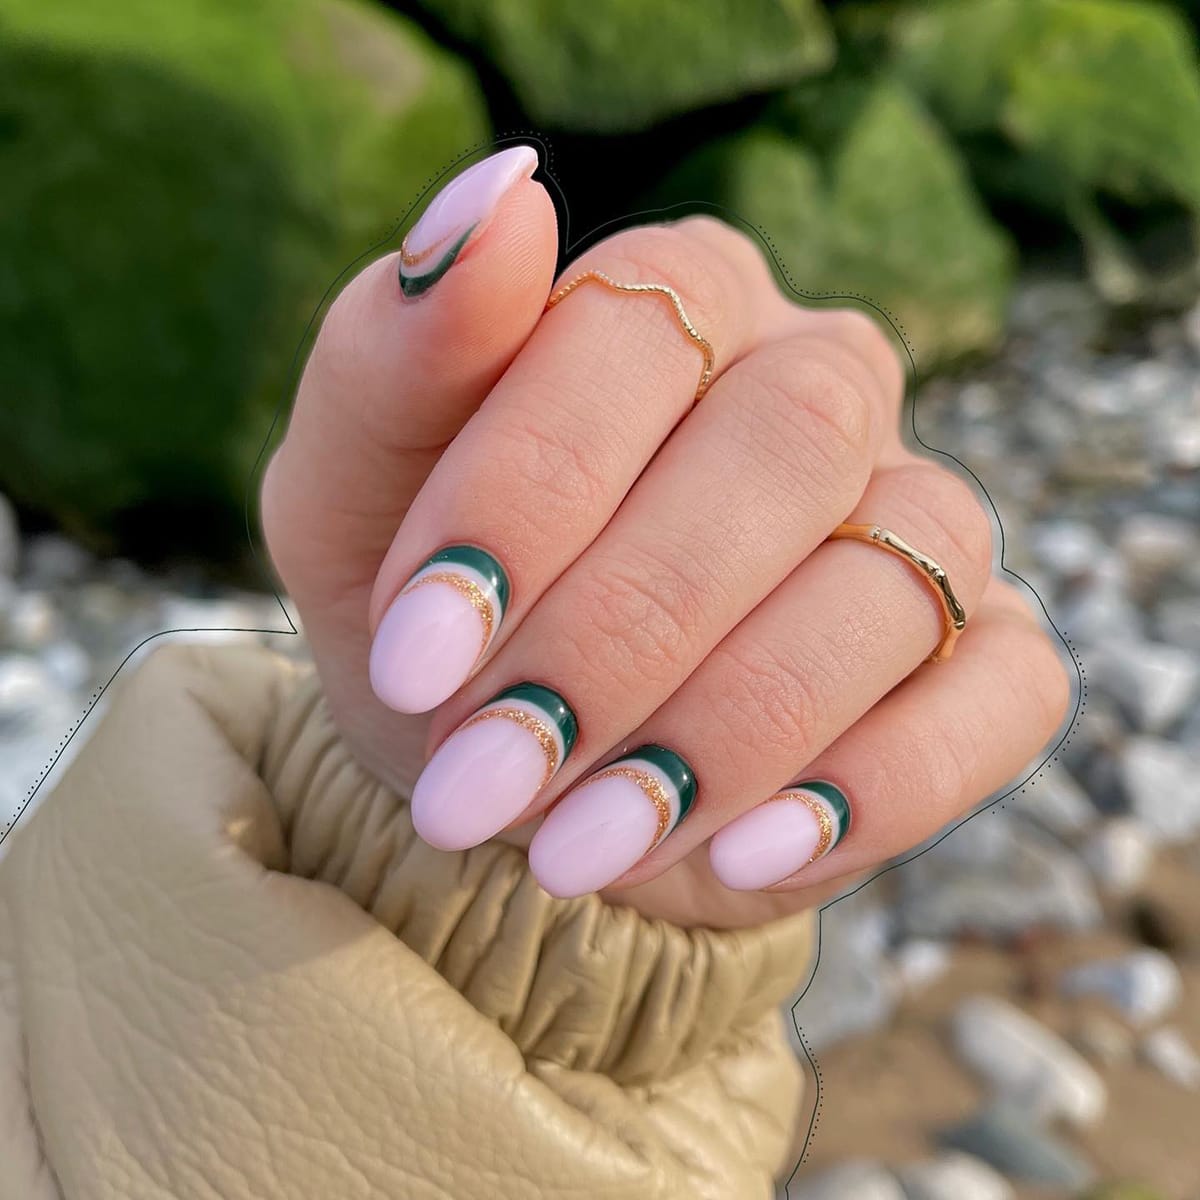
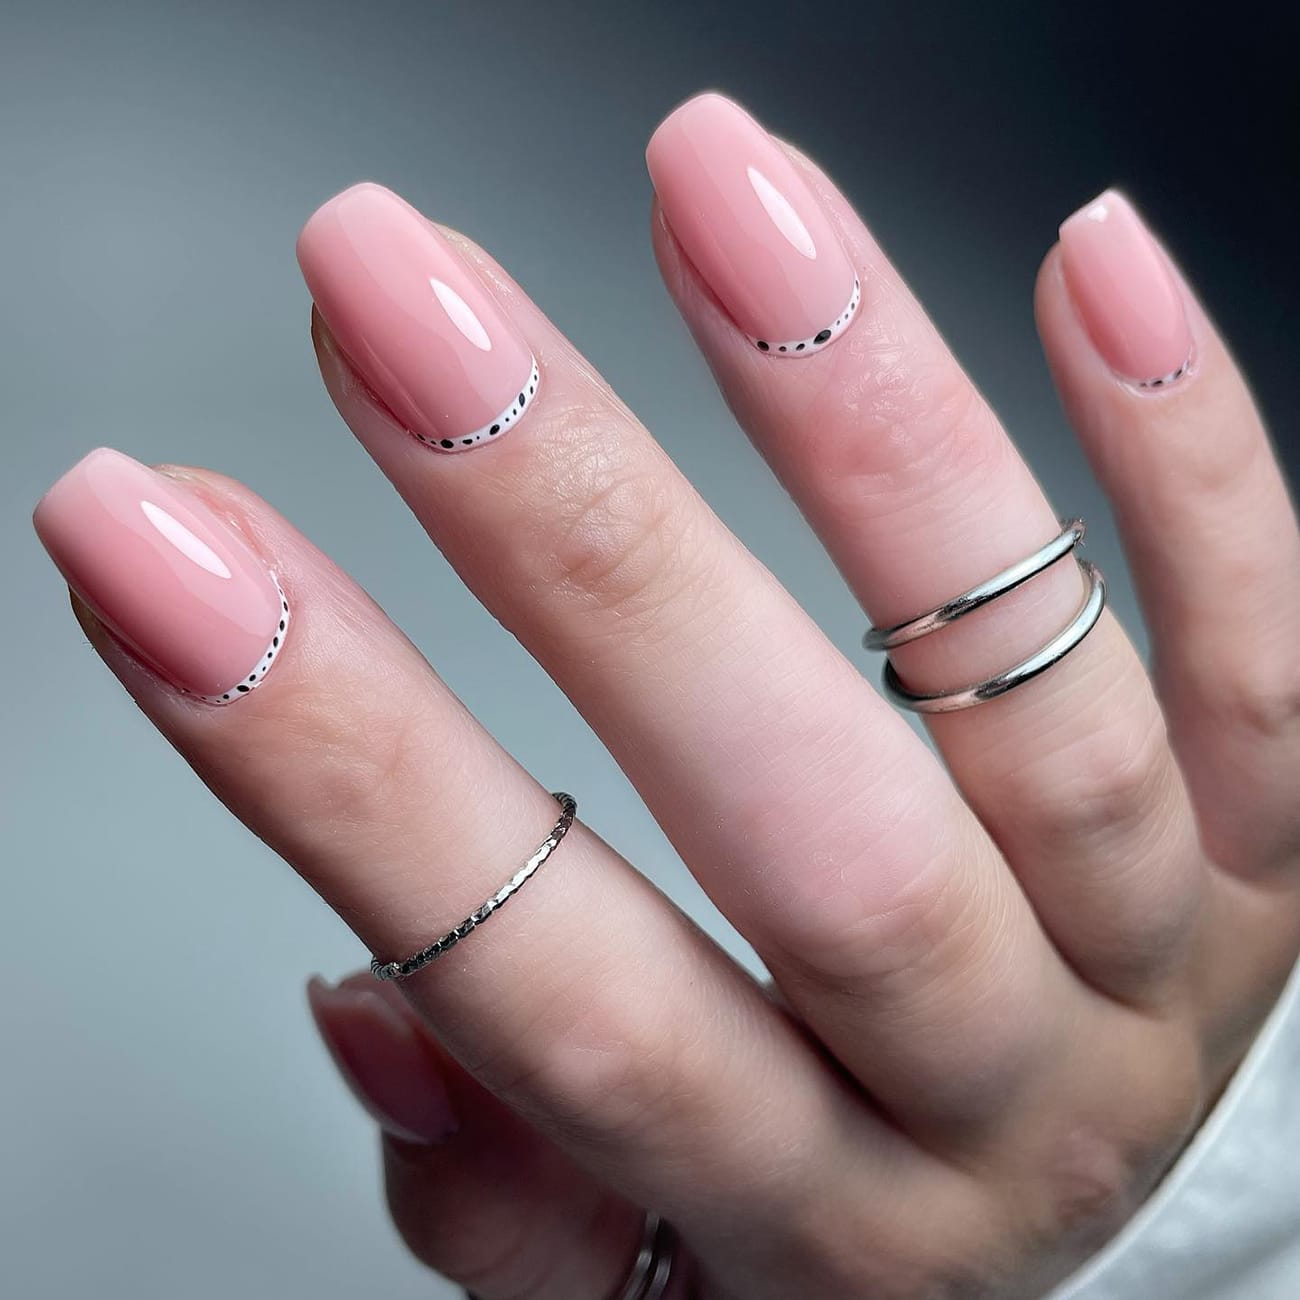
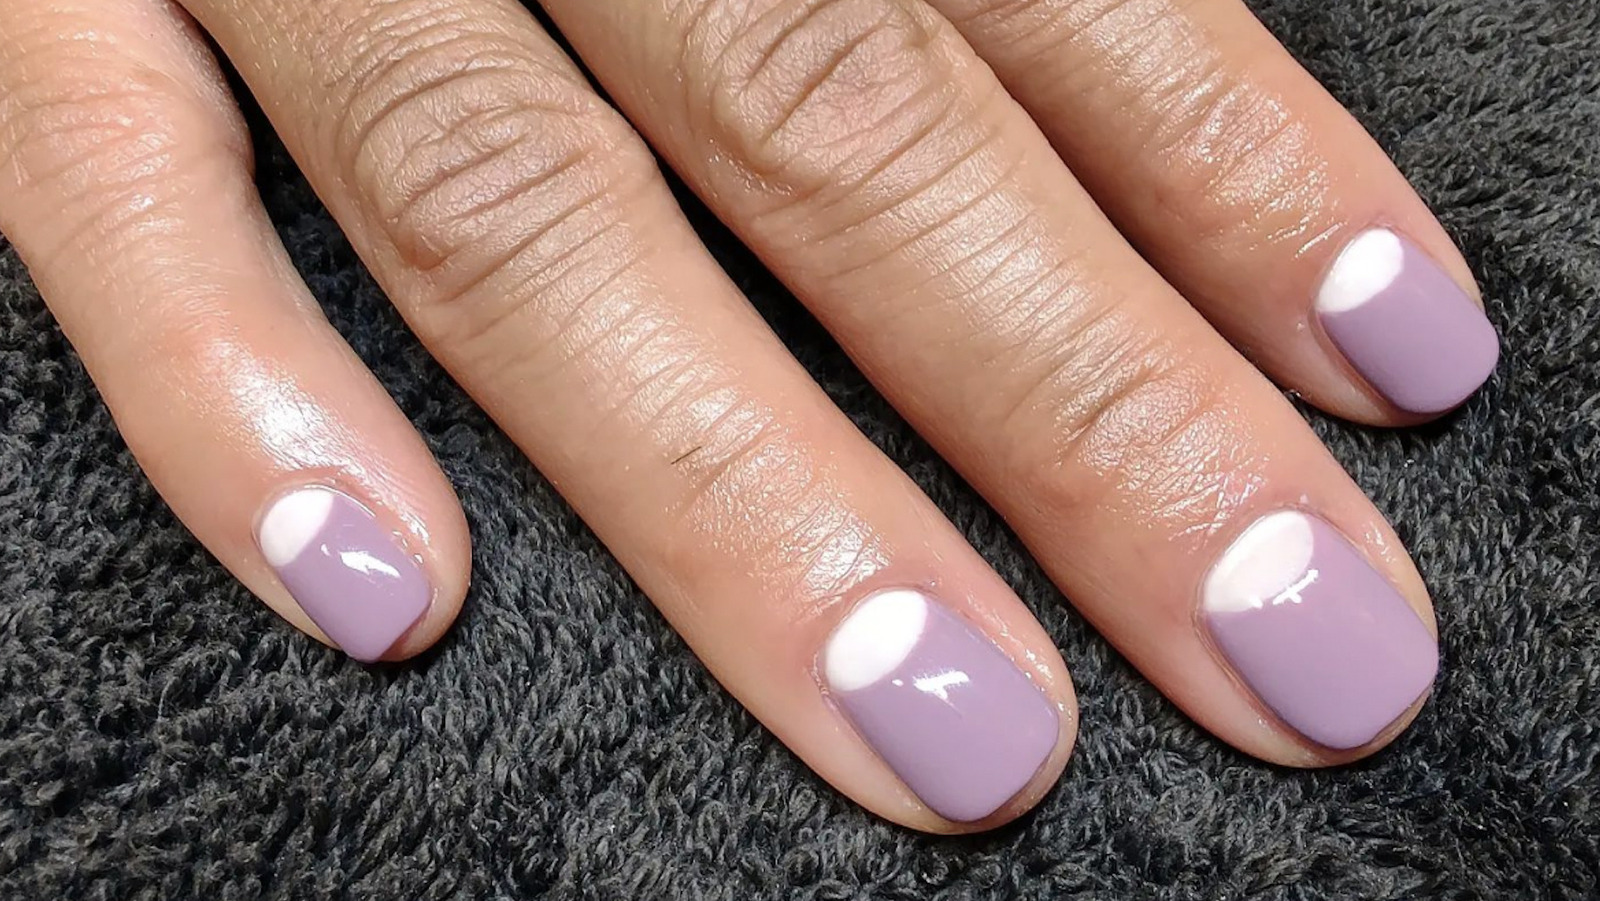
Popular Reverse French Manicure Ideas
When it comes to reverse French manicure ideas, your imagination is the only limit. There are so many ways to play with colors, textures, and finishes. Here are some popular ideas to get your creative juices flowing, just a little.
Classic Red and Nude
For a timeless yet modern look, pair a classic nude or sheer pink base with a striking red half-moon. This combination is elegant and sophisticated, perfect for any occasion. It’s a very chic choice, and it never goes out of style. You can't really go wrong with it.
The contrast between the subtle base and the bold red creates a beautiful visual. It's a refined option that still manages to catch the eye. This look is pretty popular for those who want something classic but with a contemporary edge, as a matter of fact.
Bold Contrasts
Don't be afraid to mix and match vibrant colors. Try a deep navy base with a bright yellow half-moon, or a rich emerald green with a metallic gold. These combinations are eye-catching and show off your playful side. It’s a great way to make your nails pop, you know.
Using contrasting colors really makes the half-moon stand out. It’s a fun way to experiment with your favorite shades. This approach lets you express a bit of your personality through your nail art, which is something many people appreciate.
Glitter and Sparkle
Add some sparkle to your reverse French manicure by using glitter polish for the half-moon. A nude base with a silver or gold glitter moon is incredibly glamorous. You can also use a colored base with a matching glitter, for example, for a more cohesive look. It’s very festive and pretty.
Glitter catches the light beautifully, adding a touch of magic to your nails. This is a perfect choice for parties, holidays, or whenever you want to feel a bit extra special. It really makes your hands sparkle, which is quite lovely.
Negative Space Play
For a minimalist and modern take, use negative space for your half-moon. This means leaving the lunula area clear or just with a clear coat, while painting the rest of your nail. It creates an interesting visual effect, sort of like finding the hidden details in a "reverse email search."
This style is clean, chic, and very contemporary. It’s perfect for those who prefer a more understated look but still want something unique. The natural nail showing through adds a lovely, subtle touch, you know.
Ombre Moon
Instead of a solid color for the half-moon, try an ombre effect. Blend two colors seamlessly from the cuticle outwards, or blend the moon color into the main nail color. This creates a soft, diffused look that is really pretty. It's a bit more advanced, but the result is stunning.
An ombre moon adds depth and dimension to your manicure. It’s a sophisticated option that shows off your nail art skills. This style is quite captivating and definitely stands out in a subtle way, in some respects.
How to Achieve the Look at Home
Doing a reverse French manicure at home is totally doable, even for beginners. With a few tools and a little patience, you can get salon-worthy results. It just takes a bit of practice, you know.
Gather Your Tools
Before you start, make sure you have everything you need. You'll want a base coat, a top coat, your chosen nail polish colors, and some small nail art brushes or even a dotting tool. Some people find French tip guides helpful, too, for creating that perfect curve. Having everything ready makes the process much smoother, which is helpful.
You might also want some nail polish remover and cotton swabs for any clean-up. A good quality polish will make a difference in how long your manicure lasts. So, picking good products is a pretty good idea.
Step-by-Step Guide
Prep Your Nails: Start with clean, dry nails. Push back your cuticles gently and shape your nails. Apply a thin layer of base coat to protect your nails and help the polish stick. Let it dry completely, naturally.
Apply Base Color: Paint your entire nail with your main chosen color. This will be the color that covers most of your nail. Apply two thin coats for full coverage, letting each coat dry before the next. This step is pretty straightforward.
Create the Half-Moon: Once your base color is completely dry, it's time for the half-moon. Dip a small nail art brush or the tip of a dotting tool into your second polish color. Carefully paint a curved line at the base of your nail, following the natural curve of your cuticle. Fill in the area below this line. You can also use a small, rounded sticker guide if you find it easier, as a matter of fact.
Clean Up: If you get any polish on your skin, use a small brush dipped in nail polish remover to clean up the edges. This makes your manicure look really neat and professional. A clean line is what you're aiming for, obviously.
Apply Top Coat: Once both colors are dry, finish with a clear top coat. This adds shine and helps protect your manicure from chips. Reapply every couple of days to make your manicure last even longer, you know.
Tips for a Clean Line
Getting that perfect, crisp half-moon line can be a little tricky at first, but practice makes it easier. Using a very thin brush helps a lot. You can also try using a small, rounded sticker or even a hole-punch reinforcement sticker as a guide. This helps create a neat curve, pretty much.
Make sure your first layer of polish is totally dry before you start on the half-moon. If it's still tacky, the colors might smudge together. Patience is key here, honestly. Think of it like configuring "reverse nx" for a gaming device; you want to get it just right for the best performance. Similarly, taking your time with each step will give you the best-looking nails, as a matter of fact.
Caring for Your Reverse French Manicure
To keep your reverse French manicure looking its best for as long as possible, there are a few simple things you can do. Good care extends the life of any manicure, really. It helps your hard work last.
First, always wear gloves when doing household chores, especially if you're using cleaning products or doing dishes. Chemicals and hot water can really chip and dull your polish. Also, try to apply a fresh layer of top coat every two to three days. This adds extra protection and keeps the shine. It’s a simple step that makes a big difference, you know.
Keep your hands and cuticles moisturized. Dry nails and cuticles can lead to chips and breaks. Using cuticle oil daily will keep your nails flexible and healthy. Hydrated nails are stronger and look better, obviously. Avoid using your nails as tools, like opening cans or scraping things. This is a quick way to chip your beautiful design. Be gentle with them, basically, and they'll look good for longer.
Frequently Asked Questions (FAQs)
What is the difference between a French manicure and a reverse French manicure?
A traditional French manicure has a white or light-colored tip at the very end of the nail, while a reverse French manicure has a colored or contrasting line at the base of the nail, near the cuticle. It's a simple flip of the design, you know.
Can I do a reverse French manicure on short nails?
Absolutely! The reverse French manicure looks fantastic on short nails. It can even make them appear a bit longer and more elegant. The design at the base works well no matter the length, which is pretty convenient.
How long does a reverse French manicure last?
Just like any other manicure, how long it lasts depends on the polish quality, proper application, and how well you care for your nails. With a good base coat, two coats of color, and a durable top coat, it can last anywhere from one to two weeks. Reapplying top coat helps a lot, too, it's almost a must.
Conclusion
The reverse French manicure is a truly charming and versatile nail art trend that offers a refreshing spin on a beloved classic. It lets you express your personal style in a subtle yet striking way. From bold color contrasts to delicate glitter accents, there are so many ways to make this look your own. It's a fantastic choice for anyone wanting to update their nail game, really. You can find more nail art inspiration and ideas to try out, too. So, why not give it a go and see how much you love this fresh take on a familiar style? You might just find your new favorite manicure, and that's a good thing.
Learn more about nail art on our site, and check out more ideas here.